The design editor can be opened either from "View/Design editor" menu, or
with the fourth button of the toolbar.
You can shape a uniform outlook, fitting in and suitable for the corporate identity.
The appearance of every element on the document can be freely adjusted and customized by a simple,
easy-to-learn edit surface.
We help your work with pre-set templates, which can be duplicated and modified at will. Although, limitless
numbers of custom templates can be made.
During editing, the complete preview picture can be seen immediately by pressing buttons ⌘R.
Editing document design
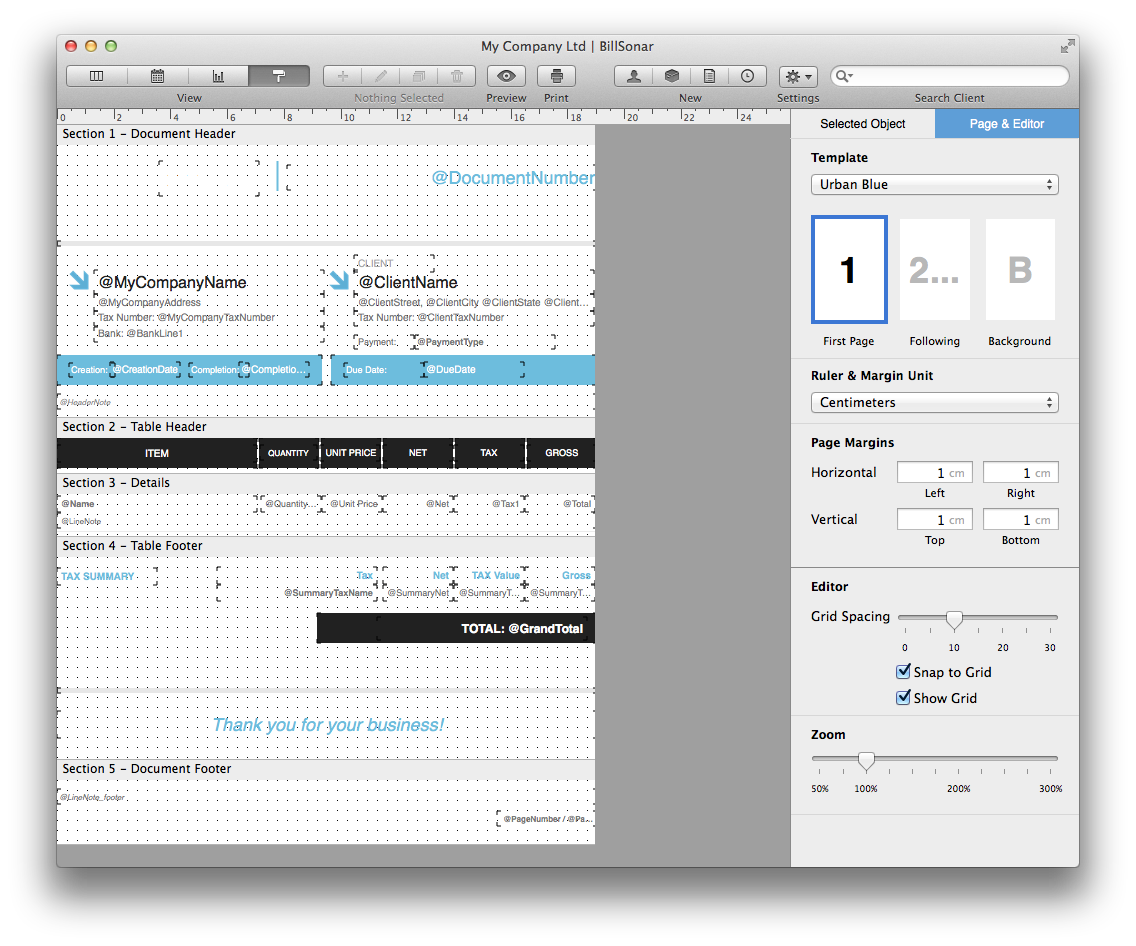
The editor surface consists of two sections. Editing and arranging elements are made In the bigger left-side one, while the features of the currently selected element can be seen on the right.
Features of document design
Features regarding the whole of the document can be set in the right-side column:
- Document type - for every document type, a separate document design can be made.
-
First and further pages - if -at a multi-page document- you want the appearance of the first page to
differ from the furthers, you can edit the differences by selecting the second page.
After editing is done given part, or even every part can be copied to next page by one click. Right-click and choose menu "Copy every part to next page".
- Rulers and margins - selecting desired unit: centimetre, inch, etc.
- Page margins - desired size of margins on pages during printing.
- View settings of editor surface (gridpoint spacing, fit elements to gridpoints, show gridpoints, scaling-up/-down editor surface).
Document parts
Every document consists of 5 main parts - except for grouped documents which consists of 7 -, these are the following:
- Header of document - the header appearing on the top of the document
- Header of chart - the chart header appearing above document lines
- Document lines - the lines repeating according to the numbers of entries fixed in the document
- Footer of chart - the footer which contains totalizations appearing under document lines
- Footer of document - the footer appearing at the bottom of the document
Inserting elements into segments
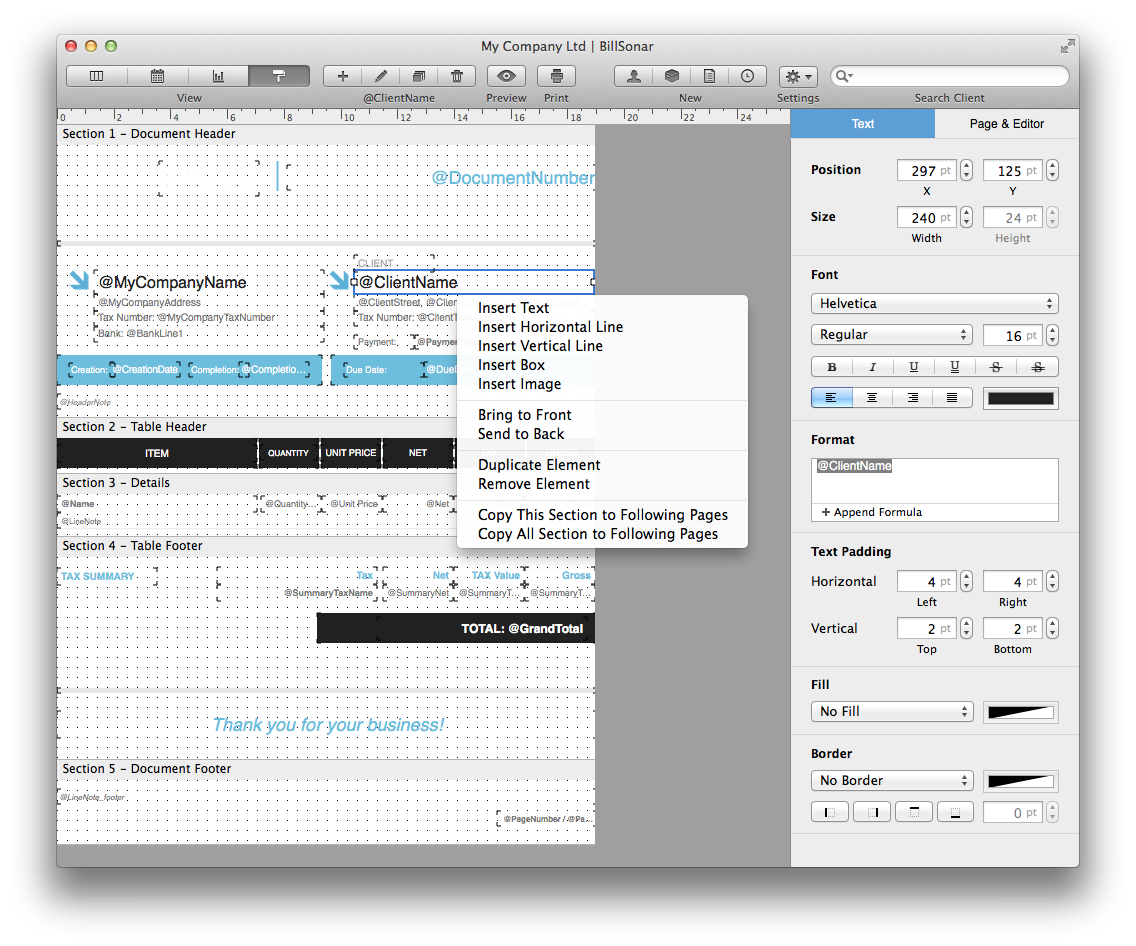
List of insertable elements can be opened by pressing the right mouse button on the selected part.

- Insertable elements can be: optional text, horizontal line, vertical line, rectangle, and image.
- Datas of the document can be placed in the text elements by pre-defined formats.
- States of overlaying elements can be set by either bringing them forward or putting them backward.
- Already completed elements can be duplicated or deleted.
- After the editing is finished, given part, or even all parts can be copied to the next page by one click.
Elements can be moved by Drag&Drop pulling or by pressing buttons ↑↓→
Sliding below
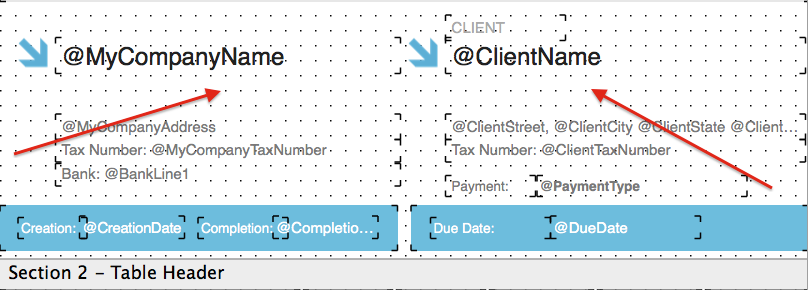
It can occur that, for example, business name will be two-lined in a column. In that case, it may be necessary to leave more underspace so the elements below can stay in one line.

Element features
Clicking on each element will show - on the right side - the features that can be assigned to that given type of element. Here can be set for example the position, font type, font style, margin, line width, colours, framing, etc.
Group selecting, editing
For group selecting, press button ⌘ and click on the elements.
You can see the selected elements on the right. These elements can be simultaneously moved or adjusted
by cursor keys.
Adjustments are always made regarding the selected elements' state in the chart.
Formats fitting into text elements
In these elements, optional text can be typed and/or pre-defined values can be placed.
Clicking on the inserted text element, there will be the Formatting input window
on the right, where the desired text can be writted in.
Changing values can be selected from the menu expanding when you click on + Adding format
at the bottom of the window.
For example, after writing in "Company name:" and selecting "@MyCompanyName" will lead to the "Company name: Demo Company" title appearing on the document.
- Document Header
- Details
- Table Footer
- Document Footer
- @DocumentNumber: number of document
- @CreationDate: creation date
- @CompletionDate: completion date
- @DueDate: due date
- @PaymentType: payment type
- @BankLine1: bank account number 1
- @BankLine2: bank account number 2
- @BankLine3: bank account number 3
- @HeaderNote: header note
- @ClientName: name of client
- @ClientTaxNumber: tax number of client
- @ClientStreet: street of client
- @ClientCity: city of client
- @ClientState: state of client
- @ClientZipCode: zip code of client
- @ClientCountry: country of client
- @ClientAddressNote: note to client's address
- @ClientEmail: email address of client
- @ClientPhone: phone number of client
- @ClientDescription: client description
- @ClientCustomField1-10: custom client fields (1-10)
- @MyCompanyName: company name
- @MyCompanyTaxNumber: tax number of company
- @MyCompanyAddress: address of company
- @MyCompanyEmail: email address of company
- @MyCompanyPhone: phone number of company
- @MyCompanyDescription: company description
- @MyCompanyCustomField1-10: custom company fields (1-10)
- @Name: name of product
- @Code: code of product
- @Custom Field1-5: custom product fields (1-5)
- @Custom Price1-5: custom unit prices (1-5)
- @Description: product description
- @LineNote: note to product line
- @Quantity: quantity unit
- @Unit: quantity
- @Net: net unit price
- @TaxName: name of tax
- @Tax1: tax amount (1)
- @Tax2: tax amount (2)
- @Total: lines total
- @SummaryTaxName: tax name summary
- @SummaryNet: net value summary
- @SummaryTax1: tax value summary (1)
- @SummaryTax2: tax value summary (2)
- @SummaryDefaultCurrencyTax1: tax base foreign currency summary (1)
- @SummaryDefaultCurrencyTax2: tax base foreign currency summary (2)
- @SummaryTotal: line value summary
- @SummarySumNet: net value line summary
- @SummarySumTax1: tax value line summary (1)
- @SummarySumTax2: tax value line summary (2)
- @SummarySumDefaultCurrencyTax1: tax base foreign currency line summary (1)
- @SummarySumDefaultCurrencyTax2: tax base foreign currency line summary (2)
- @SummarySumTotal: value sum total
- @GrandTotal: document value grand total
- @PageNumberTotal: total number of pages
- @PageNumber: number of current page
- @FooterNote: note to footer
- @ExchangeRate: exchange rate
Inserting images
Right-click on the part of the document where you would like to insert image, and choose "Insert image" from
the menu expanding.
Then simply pull the image in the "Drag Image Here" surface, appearing on the right. After that, the image
can be moved and resized at will.
If the box "Keep scale" is checked in, the image's original scale will be kept during resizing.
Statement editor
Usage of statement editor works fully like descripted in "Design Editor".
At statements, in case of formats fittable into text elements, the system will automatically offer the opportunities necessary for summary.
- Document header
- Lines group header
- Lines
- Lines group footer
- Table footer
- Document footer
- @DateStart: period starting date
- @DateEnd: period ending date
- @DocumentNumber: number of document
- @CreationDate: creation date
- @CompletionDate: completion date
- @DueDate: due date
- @PaymentType: payment type
- @HeaderNote: header note
- @ClientName: name of client
- @ClientTaxNumber: tax number of client
- @ClientStreet: street of client
- @ClientCity: city of client
- @ClientState: state of client
- @ClientZipCode: zip code of client
- @ClientCountry: country of client
- @ClientAddressNote: note to client's address
- @ClientEmail: email address of client
- @ClientPhone: phone number of client
- @ClientDescription: client description
- @DocumentNumber: number of document
- @CreationDate: creation date
- @CompletionDate: completion date
- @DueDate: due date
- @PaymentType: payment type
- @HeaderNote: header note
- @SumNet: net amount of document
- @SumTax1: tax amount of documentg (1)
- @SumTax2: tax amount of document (2)
- @SumTotal: gross amount of document
- @ClientName: name of client
- @ClientTaxNumber: tax number of client
- @ClientStreet: street of client
- @ClientCity: city of client
- @ClientState: state of client
- @ClientZipCode: zip code of client
- @ClientCountry: country of client
- @ClientAddressNote: note to client's address
- @ClientEmail: email address of client
- @ClientPhone: phone number of client
- @ClientDescription: client description
- @ClientCustomField1-10: custom client fields (1-10)
- @ClientSumTotal: gross amount of client
- @ClientSumNet: net amount of client
- @ClientSumTax1: tax amount of client (1)
- @ClientSumTax2: tax amount of client (2)
- @ItemName: product name
- @ItemCode: product code
- @ItemTaxName: tax name of product
- @ItemUnitName: quantity unit of product
- @ItemDescription: product description
- @ItemCustom Field1-5: custom product fields (1-5)
- @ItemCustom Price1-5: custom unit prices (1-5)
- @ItemSumTotal: gross total of product
- @ItemSumNet: net total of product
- @ItemSumTax1: product tax total (1)
- @ItemSumTax2: product tax total (2)
- @ItemStock: stock quantity of product
- @SummaryTaxName: tax name summary
- @SummaryNet: net amount summary
- @SummaryTax1: tax amount summary (1)
- @SummaryTax2: tax amount summary (2)
- @SummaryTotal: line amount summary
- @SummarySumNet: net amount line summary
- @SummarySumTax1: tax amount line summary (1)
- @SummarySumTax2: tax amount line summary (2)
- @SummarySumTotal: value sum total
- @GrandNet: net value grand total
- @GrandTax1: tax value grand total (1)
- @GrandTax2: tax value grand total (2)
- @GrandTotal: document value grand total
- @PageNumberTotal: total number of pages
- @PageNumber: number of current page

